Favorite Stores


Tuesday, November 13, 2018
Template 16

Template 15

Template 14

Template 13

Template 12

Template 11

Template 10

Template 9

Template 8

Template 7

Template 6

Template 5

Template 4

Template 3

Monday, November 12, 2018
Template 2

Template 1

Thursday, November 1, 2018
Around the Sea
Around the Sea

AROUND THE SEA Yuri201801 and Kajenna201802
This tutorial was written by Shell on October 31st, 2018
Any resemblance to any other tutorial is a coincidence.
All my tutorials this included is for non profit and personal use only.
You may share a link with your groups to my tutorial but please do not share my supplies.
This tutorial is written in PSP9 but should work in other versions. This tutorial also assumes you have a working knowledge of PSP.
This tutorial was written by me, and any resemblance to any other tutorial is completely coincidental.
Save your work often!
Supplies Needed:
Scrapkit by Zlata_M Blue Sea HERE
Masks by Vivienne's Paintbox Mask_DFly_0018 HERE and Keep open in PSP
Tube Clarissa by Yuki from PFD HERE
This is one of their exclusive tubes and you have to join their Exclusive Club to get this tube, however you can use any tube you wish.
Fonts I used:
Copy write Pixelette size 8
Name The Travelista HERE
Open Mask and Minimize in your PSP
Open Template 13 by Simply Made by Shell
Ctrl + D to duplicate the template and then close the original.
Highlight Large Black Circle Layer
Selection - Select All - Selection Float - Selection Defloat
Layers - New Raster Layers
Highlight the New Raster Layer you just made
Open Paper 3 from the scrapkit or a paper of choice
Edit - Copy the paper of choice
Edit - Paste - Paste into Selection
Image - Rotate - Free Rotate Settings Direction : Right Degrees : 90
Selection - Select None
Highlight Large Black Circle Layer again and go to Layers - Delete
Highlight Black Wavy Lines Layer
Selection - Select All - Selection Float - Selection Defloat
Layers - New Raster Layers
Highlight the New Raster Layer you just made
Open Paper 6 from the scrapkit or a paper of choice
Edit - Copy the paper of choice
Edit - Paste - Paste into Selection
Selection - Select None
Highlight Black Wavy Lines Layer again and go to Layers - Delete
Highlight Grey Square Layer
Selection - Select All - Selection Float - Selection Defloat
Layers - New Raster Layers
Highlight the New Raster Layer you just made
Open Paper 4 from the scrapkit or a paper of choice
Edit - Copy the paper of choice
Edit - Paste - Paste into Selection
Image - Rotate - Free Rotate Settings Direction : Right Degrees : 180
Selection - Select None
Highlight Grey Square Layer again and go to Layers - Delete
Highlight Grey Stars Layer
Selection - Select All - Selection Float - Selection Defloat
Layers - New Raster Layers
I used color #F8C102, you can use whatever color you wish.
Highlight the New Raster Layer you just made.
Click on Flood Fill Tool - Go to Materials and Change your Background Color to the color I used or one of your own choosing
Click inside each star to color the inside of the star.
Selection - Select None
Highlight Grey Stars Layer again and go to Layers - Delete
Choose your tube. I am using the Tube by Yuki called Clarissa
Edit - Copy your tube - Edit - paste as a new layer
If your tube has several layers because you can choose clothes and hair etc. you will want to go to Edit - Copy Merged (allows you to copy the tube with the color choices you made) - Paste as New Layer.
Layers - Arrange - Move to top. This will put your tube no the top layer.
If you are using the same tube as I did use the following Resize settings.
Image - Resize - 50% and make sure Resize all layers is unchecked.
Resize tube a second time with settings:
Image - Resize - 75% and make sure Resize all layers is unchecked.
Place bottom of tube even with the bottome of the Square.
Effects - Drop Shadow - Settings V & H 2 - Opacity 50 - Blur 7.92 - Color Black
Using Elements from the Scrapkit of your choice Decorate your tag.
Or Use the following Elements from the Scrapkit I am using for this tutorial.
Highlight Circle Layer and Using Element 83 go to Edit - Copy - Edit - Paste - Paste as a new layer
Image - Resize by 75% and Move to the right side of the tag.
Effects - Drop Shadow - Settings V & H 2 - Opacity 50 - Blur 7.92 - Color Black
Highlight Boat Layer and Using Element 14 go to Edit - Copy - Edit - Paste - Paste as a new layer
Image - Resize by 75% and Place at the bottom of the boat.
Effects - Drop Shadow - Settings V & H 2 - Opacity 50 - Blur 7.92 - Color Black
Highlight Tube Layer and Using Element 15 go to Edit - Copy - Edit - Paste - Paste as a new layer
Image - Resize by 50% and Move to the of the Square in the middle of the Square.
Effects - Drop Shadow - Settings V & H 2 - Opacity 50 - Blur 7.92 - Color Black
Highlight Square Layer and Using Element 4 go to Edit - Copy - Edit - Paste - Paste as a new layer
Image - Resize by 50% and Move to Left side of the tag behind the tube.
Effects - Drop Shadow - Settings V & H 2 - Opacity 50 - Blur 7.92 - Color Black
Highlight Grass Layer and Using Element 59 go to Edit - Copy - Edit - Paste - Paste as a new layer
Image - Resize by 50% and Move to the back of the tube on top of the grass.
Effects - Drop Shadow - Settings V & H 2 - Opacity 50 - Blur 7.92 - Color Black
Highlight Wood Layer and Using Element 3 go to Edit - Copy - Edit - Paste - Paste as a new layer
Image - Resize by 50% and again Image - Resize by 50% and Move to the bottom of the wood.
Effects - Drop Shadow - Settings V & H 2 - Opacity 50 - Blur 7.92 - Color Black
Highlight Starfish Layer and Using Element 20 go to Edit - Copy - Edit - Paste - Paste as a new layer
Image - Resize by 50% and Move to the Right side of the tag.
Effects - Drop Shadow - Settings V & H 2 - Opacity 50 - Blur 7.92 - Color Black
Highlight the Top Layer and Using Element 19 go to Edit - Copy - Edit - Paste - Paste as a new layer
Image - Resize by 50% and Move to the top of the Circle Layer.
Effects - Drop Shadow - Settings V & H 2 - Opacity 50 - Blur 7.92 - Color Black
Highlight Bottom Layer and Using Paper 6 Edit - Copy - Edit - Paste - Paste as a new layer
Layer - New Mask Layer - Choose From Image - Choose Mask_DFly_0018 - Source Luminance checked.
Layer - Merge - Merge Group
On the following Layers (White Square - White Wavy Lines - White Stars - Large White Circle )
Add Noise by going to Adjust - Add Remove Noise - Add Noise Settings : Uniform - Monochrome checked - Noise 39%
On the Large White Circle Layer and White Square Layer add the following Drop Shadow
Effects - Drop Shadow - Settings V & H 2 - Opacity 70 - Blur 10 - Color Black
Effects - Drop Shadow - Settings V & H -2 - Opacity 70 - Blur 10 - Color Black
On the White Stars Layer and White Wavy Lines Layer add the following Drop Shadow
Effects - Drop Shadow - Settings V & H 2 - Opacity 70 - Blur 10 - Color Black
Hide Mask Layer by clicking on the Visibility Toggle which is the Eye button on the layers.
Highlight any layer but the Mask layer
Layer - Merge - Merge Visible
Layers - View - View All
You should now have 2 layers a Merged Layer and a Mask layer
Highlight Merged Layer and Image - Resize - 85%
Layers - Merge - Merge all layers
Go to Crop Tool using the following Settings Width - 636 Height 630 - Left 41 - Top 40 - Right 677 - Bottom 670. should give you an area we are going to crop. If you used a different scrapkit you will have to adjust your crop settings.
Double click on the tag and it will auto crop to your settings.
Image - Resize by 94% and make sure All Layers is checked this time.
Adjust - Sharpness - Sharpen
If you don't have the next setting it's ok. The newer PSP I heard do not come with it, then just use the sharpen.
Adjust - Brightness ad Contrast - Clarify with Strength of 2
Add copyright and Names on your tag.
Here is another example of this tutorial I made using a FTU Kit by Mizteeque HERE
to show that you can use any kit and tube.

Hope you enjoyed this tutorial.
Please feel free to email me with any questions.
Or if you make me a tag ( I love tags!)
shell.wright@gmail.com

Thursday, October 18, 2018
Happy Halloween FTU Scrapkit

Tuesday, October 9, 2018
Trick or Treat

Trick or Treat
This tutorial was written by Shell on October 8th, 2018
Any resemblance to any other tutorial is a coincidence.All my tutorials this included is for non profit and personal use only.
You may share a link with your groups to my tutorial but please do not share my supplies.
This tutorial is written in PSP9 but should work in other versions. This tutorial also assumes you have a working knowledge of PSP.
This tutorial was written by me, and any resemblance to any other tutorial is completely coincidental.
Save your work often!
Supplies Needed:
FaniaLove tube Little Pumpkin From Digital Art Heaven . You can get it HERE
EyeCandy 4000 gradient glow
You can use any scrapkit you would like I used the two below
Mizteeque Scrapkits Miz_HalloweenTown and Miz_JeepersCreepers because they belong to the same scrap artist you can use elements from both of them.
You can get them and the Mask HERE
Mizteeque Mask 3 you will find in the JeepersCreepers Scrapkit
Fonts
Credits I used Pixelette
Names I used Pumpkins Candles
Open New Image 700 X 700 Transparent
Flood fill tool > Fill with White
Rename layer White Background.Copy Element 25 from the Scrapkit Miz_HalloweenTown > Paste as a New Layer. Add EyeCandy 4000 Gradient Glow Settings > Basic Tab > Glow Width 3 - Soft Corners 25 - Overall Opacity 100 - Check Draw Only Outside Selection. Color Tab - White. Effect > 3d Effects > Drop Shadow V&H 2 Opacity 50 Blur 7.92.
Copy Element 14 from the Scrapkit Miz_HalloweenTown > Paste as a New Layer. Move over to the left of the Halloween Word Frame. Effect > 3d Effects > Drop Shadow V&H 2 Opacity 50 Blur 7.92.
Copy Element 28 from the Scrapkit Miz_HalloweenTown. > Paste as a New Layer. Image > Resize (shortcut Shift + S) 50%, make sure resize all layers is Unchecked. Image > Resize again 50% Place left of the Castle. Effect > 3d Effects > Drop Shadow V&H 2 Opacity 50 Blur 7.92.
Copy Element 20 from the Scrapkit Miz_HalloweenTown. > Paste as a New Layer. Image > Resize (shortcut Shift + S) 50%, make sure resize all layers is Unchecked. Place in front of the Tombstone slightly to the right, look at my tag for placement. Effect > 3d Effects > Drop Shadow V&H 2 Opacity 50 Blur 7.92.
Copy Element 13 from the Scrapkit Miz_JeepersCreepers. > Paste as a New Layer. Image > Resize (shortcut Shift + S) 50%, make sure resize all layers is Unchecked. Place on the Right side of Tag. Effect > 3d Effects > Drop Shadow V&H 2 Opacity 50 Blur 7.92.
Copy Element 3 from the Scrapkit Miz_JeepersCreepers. > Paste as a New Layer. Image > Resize (shortcut Shift + S) 50%, make sure resize all layers is Unchecked. Image > Rotate > Free Rotate > Settings : Direction Right > Degrees 90 > All Layers and Rotate single layers around canvas center both unchecked. Image > Mirror. Place on the Left side of Tag leaning against Tombstone. Effect > 3d Effects > Drop Shadow V&H 2 Opacity 50 Blur 7.92.
Copy and Paste your Tube as a New Layer. I am using the Tube by FaniaLove called Little Pumpkin. Image > Resize (shortcut Shift + S) 50%, make sure resize all layers is Unchecked. Effect > 3d Effects > Drop Shadow V&H 2 Opacity 50 Blur 7.92.
Copy Element 38 from the Scrapkit Miz_JeepersCreepers. > Paste as a New Layer. Image > Resize (shortcut Shift + S) 50%, make sure resize all layers is Unchecked. Image > Resize again 50% again and Image > Resize again 50% for the third time. Image > Mirror and Place on the Right side of tag leaning against Witches Hat. Effect > 3d Effects > Drop Shadow V&H 2 Opacity 50 Blur 7.92.
Copy Element 65 from the Scrapkit Miz_JeepersCreepers. > Paste as a New Layer. Image > Resize (shortcut Shift + S) 80%, make sure resize all layers is Unchecked. Attach to Word Art Frame. Add EyeCandy Gradient Glow Settings > Basic Tab > Glow Width 3 > Soft Corners 25 > Overall Opacity 100 > Check Draw Only Outside Selection. Color Tab > White. Effect > 3d Effects > Drop Shadow V&H 2 Opacity 50 Blur 7.92.
Layers > Arrange > Send to Bottom and then move up just above Raster 1.
Using your Eraser Tool settings : Shape - Square > Size - 40 > Hardness - 100 > Step - 25 > Density - 100 > Thickness - 100 > Rotation - 0 > Opacity - 100. Erase the top of the web so it looks like it is coming out of the Word Frame.
Copy Element 15 from the Scrapkit Miz_HalloweenTown. > Paste as a New Layer. Image > Resize (shortcut Shift + S) 50%, make sure resize all layers is Unchecked. Image > Resize 80%.Place in middle of tag on bottom. Effect > 3d Effects > Drop Shadow V&H 2 Opacity 50 Blur 7.92.
Copy Element 24 from the Scrapkit Miz_HalloweenTown. > Paste as a New Layer. Image > Resize (shortcut Shift + S) 50%, make sure resize all layers is Unchecked. Place against girls arm on the left side. Effect > 3d Effects > Drop Shadow V&H 2 Opacity 50 Blur 7.92.
Click on Raster 1 Layer
Layers > New Raster Layer > Rename Background 1
Selections > Select All
Copy Paper 4 from Miz_JeepersCreepers Scrapkit
Edit > Paste > Paste into Selection
Select None.
Open Mask 3 from Miz-JeepersCreepers and Minimize
Select Background 1
Layers > New Mask Layer > From Image
Settings : Source Luminance checked > Select your Mask 3 from Miz_JeepersCreepers > Invert Mask Data unchecked. Click OK
Layers > Merge > Merge Group.
Layers > New Raster Layer > Rename Background 2
Selections > Select All
Copy Paper 2 from Miz_JeepersCreepers Scrapkit
Edit > Paste > Paste into Selection
Select None.
Layers > New Mask Layer > From Image
Settings : Source Luminance checked > Select your Mask 3 from Miz_JeepersCreepers > Invert Mask Data unchecked. Click OK
Layers > Merge > Merge Group.
Image > Resize (shortcut Shift + S) 80%
Adjust Blur > Gaussian Blur > Radius 5
Delete Raster 1 Layer ( your white layer)
Layers > Merge > Merge Visible
Image > Resize (shortcut Shift + S) 90% All Layers checked.
Adjust > Brightness > Clarify > Strength of Effect 2
If you don't have Clarify then you can use the following.
Adjust > Sharpen > Sharpen More.
Add your copy write
I used Pixelette size 8 Black
Add EyeCandy 4000 Gradient Glow Settings: Basic Tab > Glow Width 3 > Soft Corners 25 > Overall Opacity 100 > Check Draw Only Outside Selection. Color Tab > Color F2A06A.
Effect > 3d Effects > Drop Shadow V&H 0 Opacity 50 Blur 5.
Image > Rotate > Free Rotate > Settings : Direction Left > Degrees 90 > All Layers and Rotate single layers around canvas center both unchecked.
Move to the left of your tag.
Add Names to your tag.
I used Pumpkins Candles size 48 Black
Add EyeCandy 4000 Gradient Glow Settings: Basic Tab > Glow Width 3 > Soft Corners 25 > Overall Opacity 100 > Check Draw Only Outside Selection. Color Tab > Color White.
Effect > 3d Effects > Drop Shadow V&H 2 Opacity 50 Blur 7.92.
I placed mine up by the SpiderWeb but place it where you like it best.
Your all done!
Hope you enjoyed this tutorial.
Saturday, October 6, 2018
Test post! New labels

Tuesday, August 21, 2018
School House Rock

This tutorial was written by Shell on August 13th 2018
Any resemblance to any other tutorial is a coincidence.
All my tutorials this included is for non profit and personal use only.
You may share a link with your groups to my tutorial but please do not share my supplies.
This tutorial is written in PSP9 but should work in other versions. This tutorial also assumes you have a working knowledge of PSP.
This tutorial was written by me, and any resemblance to any other tutorial is completely coincidental.
Save your work often!
Just wanted to say you do NOT have to use a PTU kit and or the psp tubes that I used. You can use whatever kit and tube you want to use.
Supplies Needed: This is what I used for my tutorial
Tube of Choice, I used the following CDO Cuddly Rigor Mortis Tubes.
114-2
79-2
You can get them HERE
Shell's Template 04 PSD get HERE PSP get HERE
Scrapkit by ScrapFoxy Back to School get HERE
Mask by dragonfly Mask_Dfly_0018 get HERE
Fonts I used ( you can use whatever fonts you wish )
I used Pixelette for my copy write
I used Amper Deco for my names
Open Shell's template 04
Shift - D to make a copy and close the original
Image > Canvas Size
Settings Width 600 x Height 600 Centered
Delete Copy Write layer
Go to 4 Square white layer
Selection > Select all
Selection > Float
Selection > Defloat
Add new raster layer
Copy and Paste Paper 11 into selection
Select > None
Adjust > Add/Remove Noise > Add Noise
Settings Uniform checked -Noise 50 - Monochrome checked
Effect > 3D Effects > Drop Shadow
Settings V&H 4 Opacity 70 Blur 10
Delete the original 4 Square white layer.
Go to 4 Square black layer
Selection > Select all
Selection > Float
Selection > Defloat
Add new raster layer
Copy and Paste Paper 8 into selection
Select > None
Delete the original 4 Square black layer.
Go to Lg Black Circle layer
Selection > Select all
Selection > Float
Selection > Defloat
Add new raster layer
Copy and Paste Paper 11 into selection
Select > None
Adjust > Add/Remove Noise > Add Noise
Settings Uniform checked -Noise 50 - Monochrome checked
Effect > 3D Effects > Drop Shadow
Settings V&H 4 Opacity 70 Blur 10
Delete the original Lg Black Circle layer.
Go to Lg White Circle layer
Selection > Select all
Selection > Float
Selection > Defloat
Add new raster layer
Copy and Paste Paper 2 into selection
Select > None
Layers > Layer Properties and change opacity to 50
Delete the original Lg White Circle layer.
Go to Trio Lines layer
Selection > Select all
Selection > Float
Selection > Defloat
Add new raster layer
Flood Fill each line with Black
Selection > Modify > Contract Setting by 2
Copy and Paste Paper 11 into selection
Adjust > Add/Remove Noise > Add Noise
Settings Uniform checked -Noise 50 - Monochrome checked
Select > None
Delete the original Trio Lines layer.
Make sure your on the top layer.
Copy and Paste Cuddly Rigor Mortis tube 114 as a new layer.
Layer > Arrange > Move down
Image > Resize by 50% (Shift - S) this is the shortcut key
Move tube up using the Move tool until the bottom of the tube is behind the bottom of the trio strip
Effects > 3D Effects > Drop Shadow
Settings V&H 2 Opacity 50 Blur 8
Element 3 Copy and Paste as a New layer
Image > Resize by to resize 50% and again at 50%
Move to the bottom left of the tag so its in the middle of the square background
Effects > 3D Effects > Drop Shadow
Settings V&H 2 Opacity 50 Blur 8
Element 35 Copy and Paste as a New layer
Image > Resize by to resize 50% and again at 50%
Move to the bottom left of the books (element 3)
Effects > 3D Effects > Drop Shadow
Settings V&H 2 Opacity 50 Blur 8
Element 47 Copy and Paste as a New layer
Image > Resize by to resize 50% and again at 50%
Move to the bottom Right of the tag so its in the middle of the square background
Effects > 3D Effects > Drop Shadow
Settings V&H 2 Opacity 50 Blur 8
Element 2 Copy and Paste as a New layer
Image > Resize by to resize 50% and again at 50%
Image Mirror
Move to the bottom Right of the tag so on the far side of the Pencil cup (element 47)
Effects > 3D Effects > Drop Shadow
Settings V&H 2 Opacity 50 Blur 8
Copy and Paste CRM Tube 79-2 (I used the second merged layer with artwork and pencil)
Image > Resize by 50%
Position in bottom and middle of tag
Effects > 3D Effects > Drop Shadow
Settings V&H 2 Opacity 50 Blur 8
Layers > Merge > Merge visible
Image > Resize 85%
Adjust > Brightness and Contrast > Clarify > 2
Add new raster layer
Layers > arrange > move down
Selections > Select all
Copy and paste paper 12 into selection.
Select None
Layers > New Mask Layer > choose Mask_Dfly_00189 > source luminescence checked.
Layer > Merge > Merge group
Add your copy write
Merge all visible layers
Layers > Merge > Merge Visible
Add Names on your tag.
Hope you enjoyed this tutorial.
Wednesday, May 30, 2018
Foxy Stamp

This tutorial was written by Shell on May 30th 2018
Any resemblance to any other tutorial is a coincidence.
All my tutorials this included is for non profit and personal use only.
You may share a link with your groups to my tutorial but please do not share my supplies.
Supplies needed:
PSP I used PSP 9 but you can use any PSP program
Any resemblance to any other tutorial is a coincidence.
All my tutorials this included is for non profit and personal use only.
You may share a link with your groups to my tutorial but please do not share my supplies.
Supplies needed:
PSP I used PSP 9 but you can use any PSP program
2 Fonts of choice, one for copy write and one for name on tag.
Preset Shape called SK Stamps 03 I don't remember where I got these so if it is yours please let me know so I can give you credit. You can get them HERE
Place the Preset Shapes in your Preset Shapes folder.
Tube of choice. I used Ash Evans 30-1 tube which you can get at CDO HERE
I also used the following PTU Scrapkit, but you can use any kit you want to.
Sophisticat Simone "Claire" at CDO
HERE
I am assuming you have a working knowledge of PSP.
Drop Shadow Setting:
V & H 2
Opacity 70
Blur 10
Color Black
Ok Lets Start
Open a New Image 800 X 800
Go to View Rulers and make sure your ruler is on or y ou can use the shortcut CTRL+ALT+R
Preset Shape Tool > Preset Shape > Choose one of the stamp Presets I used Preset SK Stamps 03
with the following settings
Anti-Alias checked Line Style Solid Line Width 3 ( you can play with this and make it as thin or thick as you wish)
Change your colors on your color palate Use colors from your tube. I used the following colors
Foreground #514135
Background #A67555
Draw Stamp starting at 50 / 150 and draw it out to 550/550
Object Align Center on Canvas.
Layer Convert to Raster Layer
Open your tube of choice, copy and go to your tag workspace and paste as a new layer.
If you used the same tube as I did then Resize 85%
Duplicate and move duplicate under the stamp frame
Add drop shadow with above settings to both tube layers.
Click on the stamp frame layer and using your magic wand with the settings:
Mode :Add Shift MatchMode RGB Tolerance 0 Contiguous checked Feather 0
Click inside the Stamp frame then Selection Expand 3 then Selection Invert
Click on the bottom tube layer that is under the frame and hit delete.
Select None
Move up to your top tube layer and using the eraser tool with the settings:
Square Size 150 Hardness 100 Step 1 Density 100 Thickness 100 Rotation 0 and Opacity 100
Your going to erase the bottom part of the tube that is overflowing onto the stamp frame.It doesn't matter if you get a bit of the fox because that is why we have the bottom tube layer :)
This is the easiest way that I know how to allow parts of the tube show over the frame or object underneath. See I wanted the foxes head and ears left above the frame.
Add a background paper from your scrapkit of choice and arrange send to bottom.
using magic wand again with same settings click inside the frame again and selection > modify > expand 3 and Selection Invert
Go back to your background layer and hit delete.
ok now this is where you add any elements from whichever scrapkit you are using. layer them aroiund your frame in whatever placement you wish and add a drop shadow with above settings to each element.
once you are done then merge > merge layers
Resize 70% and make sure the Resize all layers is checked.
Adjust > Brightness and Contrast > Clarify Setting 2
Add your copy write and name(s) to your tag and save a a png.
I hope you enjoyed this tutorial.
I would love to see your results and you can email me
shell.wright@gmail.com
Wednesday, May 16, 2018
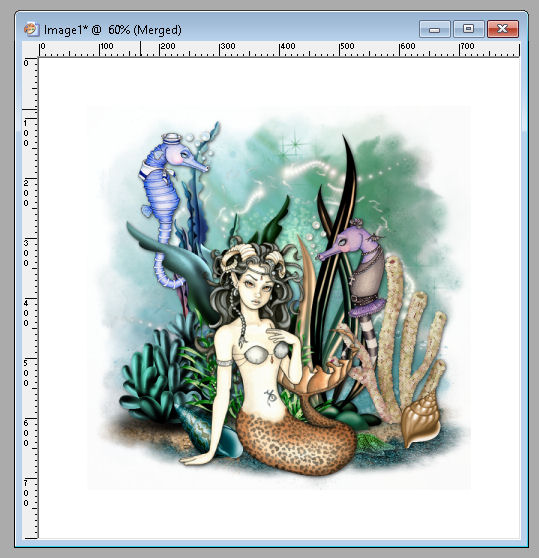
Caron Vinson Mermaid

This tutorial was written by Shell on May 13th 2018
Any resemblance to any other tutorial is a coincidence.
All my tutorials this included is for non profit and personal use only.
You may share a link with your groups to my tutorial but please do not share my supplies.
Supplies needed:
PSP I used PSP 9 but you can use any PSP program
Tube of choice. I used Caron Vinson 31-1 Capricorn tube and 56-2 Gothic Seahorse and 56-3 Sailor Seahorse tube which you can get at CDO HERE
Sophistical Simone Mask 69 Download HERE
Sophistical Simone Mask 60 Download HERE
I have permission from Simone to provide her mask as she closed her site down.
I have permission from Simone to provide her mask as she closed her site down.
Open your Masks in PSP and leave it open to use. You can minimize to the bottom of your screen.
I also used the following Scrapkit.
Bibis Deluxe Mermaid Scrapkit that you can find on Scraps and Company
HERE
its $1.00 right now but do not know if it will stay that price but, you can use any kit you wish.
Fonts I used on my name was Oh January and you can get it by clicking on the font name.
I also used the following Scrapkit.
Bibis Deluxe Mermaid Scrapkit that you can find on Scraps and Company
HERE
its $1.00 right now but do not know if it will stay that price but, you can use any kit you wish.
Fonts I used on my name was Oh January and you can get it by clicking on the font name.
Settings used on Name is Size 72 Stroke 1 Colors D8F729 and 15555A
Font used on my copy right is Pixelette and that is a pay to use font so I can not supply it but you can use any pixel font for your copy right. Size used 8 and color used 15555A I also added a slight Gradient Glow with EyeCandy 4000 colorC5F6DA settings Glow Width 3 Soft Corners 25 and Overall Opacity 100
I am assuming you have a working knowledge of PSP.
Drop Shadow added to all layers unless I say not to.
Drop Shadow Setting:
V & H 2
Opacity 70
Blur 10
Color Black
Ok Lets Start
Open new image 800 x 800
Open Paper 8 , copy and paste as a new layer. Resize 90% and Resize 90% again.
Right click on the layer and choose New Mask Layer , From Image, Go to Source Window and choose Simone Mask #69, Right click on layer and click Merge Group.Double Click on this layer and the Layers Property Box Opens Rename this layer Background 1 and change Opacity to 75
Open Paper 2 , copy and paste as a new layer Resize this layer 90% and again Resize 90%, go to Image and mirror. Double click on this layer and Layer Property Box opens and rename this layer Background 2. Right Click on layer and choose New Mask Layer, From Image, Go to Source Window and choose Simone Mask #60. Now go to Arrange, Move Down and this mask layer should be below Background 1 layer.
Now we are going to build up the tag by using elements.
This is where you start adding Drop Shadow unless otherwise told not to.
Open Element 22 and copy and paste as a new layer. Resize 60% and add the drop shadow to it. Move it down to the bottom of the tag. See my position for placement.
Open Element 21 and copy and paste as a new layer. Resize 55% and add
the drop shadow to it. Move it down to the bottom of the tag and offset the previous element. See my
position for placement.
Right click on layer and Merge, Merge Down.
Open Element 103 , copy and paste as a new layer. Resize 50%. Do NOT add a drop shadow to this element. Right click on layer and duplicate and on the duplicate layer go to Image, Mirror then Merge, Merge Down.
Open Element 84, copy and paste as a new layer, Do NOT add a drop shadow to this element. Arrange , Move Down and Arrange, Move down again. Right click and Duplicate layer, on duplicate layer Image, Mirror
Open Element 49 copy and paste as a new layer Do Not add Drop Shadow to this element
Open Element 12, copy and paste as a new layer. Resize 50% Do NOT add drop shadow.
Open Element 17, copy and paste as a new layer. Resize 75% Do NOT add a drop shadow. Arrange towards bottom at the edge of the rocks.
Open Element 23 , copy and paste as a new layer. Resize 50% , Add Drop Shadow and place on the left side of the tag.
Open Element 71 , copy and paste as a new layer. Resize 50% , Add Drop Shadow and place on the Right side of the tag.
Open Element 64 , copy and paste as a new layer. Resize 65% , Add Drop Shadow . Arrange, Move Down and position slightly to the right side of the tag.
Open Element 90 , copy and paste as a new layer , Add Drop Shadow and place slightly to the left behind the other plant
Open Element 3 , copy and paste as a new layer. Add Drop Shadow and place in the middle of the tag.
Open Element 91 , copy and paste as a new layer. Add Drop Shadow and Arrange, Move Down ( repeat the Arrange Move Down step 4 times)
Now some baubles, I used Elements 109,110,and 70 which are shells and resized them all 50% and added the Drop Shadow to them and place them where you want them.
I did not use any of the fish because I had Seahorses from Caron Vinson but if you do not use her tubes or do not have the Seahorses then by all means add some fish.
If you did use Caron Vinson's Seahorses then resize them by 65% and weave then into the layers where they look good. As you see I put them behind some plants and in front of others so I can still see them. Do add the drop shadow to them.
Caron has alot of mermaids and you can use any of them or any other tube, however if you use the same tube that I did then you need to Resize to your taste. I didnt resize much I think it was 75% or something like that.
Now your thinking this tag is hugeeee! Because we started at 800 x 800 but we are going to fix that.
First click on the eye for Raster 1 and make it invisible and then Merge all visible layers.
Resize Merged layers 80%. Reopen your Raster 1 layer by clicking the eye again and flood fill with white.
Now you can see the edges of the Mask's we used. We are going to fix that. Make sure your on your Merged layer and go to Eraser tool with the following settings:
Choose Round
Size 70
Hardness 50
Density 50
Now just click on the Merged Layer where you see the extra mask at the edges. It will take several times clicking as we dropped the settings so we don't erase parts of the tag. If you see you hit to close to your tag then, undo and proceed again. I am showing you before and after images of my tag, so you can see what it should look like at the end.
Before
After Mask is cleaned up

Now once you have your Mask background cleaned up.
Go to your Crop Button and use the following settings:

Width 685 height 661 pixels
Left 70 Top 77 Right 755 Bottom 738
Double click on your image and that will complete the crop.
Now you can delete Raster 1 which is the white background
Resize your Image 87% and make sure that all layers is checked this time.
Adjust Sharpness, Sharpen
Adjust Brightness & Contrast, Clarify with Strength of 2. This is the setting for this I like but you can play around with it if you wish.
Ok now add your copy right and then your name and save as a png file and you are done.
I hope you liked this tutorial. I try to do that step by step so you don't get lost.
You can always email me at shell.wright@gmail.com with any questions or anything.
Tuesday, May 8, 2018
Sea and Me

This tutorial was written by Shell on May 8th 2018
Any resemblance to any other tutorial is a coincidence.
All my tutorials this included is for non profit and personal use only.
You may share a link with your groups to my tutorial but please do not share my supplies.
Supplies needed:
PSP I used PSP 9 but you can use any PSP program
Tube of choice. I used Zlata_M Surfer tube which you can get at picsfordesign.com
Sophistical Simone Mask 7 Download HERE
I have permission from Simone to provide her mask as she closed her site down.
EyeCandy 4000 Optional
I also used the following Scrapkit.
GOF (Graphics of Fantasy) Blue Sea Scrapkit that you can find on Zlata_M's Store
HERE
its $1.50 but, you can use any kit you wish.
Fonts I used on my name was Unicorn Giggle and you can get it by clicking on the font name.
Font used on my copy right is Pixelette and that is a pay to use font so I can not supply it but you can use any pixel font for your copy right.
I am assuming you have a working knowledge of PSP.
Ok lets get started.
Open Simone Mask 7 and leave open in PSP
Open a new canvas 700 X 700 Transparent
Open Paper 4 or a paper of your choice and copy and paste as a new layer.
Rename this layer Background.
Open Blue Sea Frame (looks like a port hole) or a frame of your choice and copy and paste as a new layer.
Resize 80% and make sure resize all layers is unchecked.
Add drop shadow by going to Effect - 3D - Drop shadow I used the following settings V&H 2 - Opacity 70 - Blur 10.00 - Color Black
add another drop shadow the same settings but change the V&H to -2.
Rename layer Frame.
Right click on your Background layer choose New Mask Layer - from image - choose Sophistical Simone Mask 7 and click ok.
right click on mask layer and choose merge mask.
Duplicate background layer
On bottom background layer add a Gaussian blur by going to Adjust - Blur - Gaussian Blur with radius 20.00 click ok.
On Copy of Background layer Resize 90%
Move back up to the Frame layer.
I am goign to add my elements and tube step by step. If you use different elements then you will have to resize and place them as they please you.
Open Element 5 copy and paste between the frame and background layer.
Move back to the Frame layer
Open Element 9 copy and paste above the frame, resize 75%
Image Mirror and move to the right side of the frame. Look at mine for placement.
add the same drop shadow that we used above.
Copy and Paste your tube next If your using the same tube as I am you will need to resize 50% add same drop shadow. Move to the right side of the frame.
Open Element 24 copy and paste as a new layer. Image Mirror, Image Flip and move to the bottom of the Frame and place most in front of the Tube to cover his shorts. Add the same drop shadow.
Open Element 4 and copy and paste as a new layer. Move this layer below your tube layer and also move it to the right of the frame slightly. Add same drop shadow.
Open Element 59 copy and paste as a new layer. Resize 75% and move to the left size of the frame. Add same drop shadow.
Open Element 20 copy and paste as a new layer and go to Image Mirror, Resize 75% and again add same drop shadow.
Open Element 33 copy and paste as a new layer. Resize 50% and then resize again by 75% and place on the left side of the tag. Add the same drop shadow.
Open Element 3 copy and paste and add as a new layer. Resize 75% and again by 75% place next to the other shell. Add the same drop shadow.
Open Element 22 copy and paste and add as a new layer. Resize 50%. Arrange - Move down under starfish. Add the same drop shadow.
You can place your elements anywhere you want to this is just where I wanted to place mine. You can also use your own elements and place them where you want. I am using the shells as my base part of the tag and to cover my guys shorts :)
Open Element 1, copy and paste as a new layer resize 75% Move down under the Pelican layer. Add same drop shadow.
Open Element 64 go to Arrange - Move to bottom, add same drop shadow.
Hide the 3 background layers which should be the Birds and 2 background layers and then right click and merge visible.
Resize the merged layer 80%. Right click and go to View and then all. Right click again and merge visible.
Resize tag by 85% and this time make sure all layers are checked.
Go to Adjust - Brightness & Contrast - Clarify and use 2 as the Strength Setting
Add your copy right I used pixelette size 8 color #5e7782 and if you did as vector then convert to raster. I added Eye Candy 4000 gradient glow to mine setting 3 25 100 color a3cfbd
Now if you don't have EC4000 you can just add a drop shadow to put a bit of color under your copy right. I used V&H 0 Opacity 70 Blur 5 color a3cfbd. doesn't look the same as eyecandy but it gives you a bit of color.
Add your name I used Unicorn Giggles 100 stroke 1 colors foreground #edeade and background #a6c7cc. Add same drop shadow to your tag and your done merge all and save your tag as a PNG.
I hope you enjoyed my tutorial and will come back and visit. I will be putting more tutorials up as I go along.
Hugs, Shell
Friday, March 9, 2018
Scrapkits
Thursday, March 8, 2018
Intellectual Bad Ass
Intellectual BadAss

Shell's Template 03 PSD is HERE and PSP is HERE
Tube of Choice I used PinupToons which is a PTU Artist and you can get that at CDO HERE
2 fonts of choice for Copy write and name on tag
I am using pixelate for copy write and Predacon Beasts for Name on tag.
Mask_0030_DFly by Vivian by Vivian's Paintbox You can get that HERE and please visit the rest of her blog
Open template and Mask in your psp.
drop mask down you will need it later.
CTRL + D on template and close the original out to save.
Working on the template go to Image, Canvas and make your canvas size 700 x 700 with the middle box selected to center the template.
If you want to change parts of the template they are all on separate layers so you can do so if you want. I wrote this tutorial using the template as is.
Open up the tube you wish to use.
Copy and paste it on your template and resize as needed and place on the template move it to where you want it.. I moved mine so the Words We Prefer the term Intellectual BadAss could be seen.
Add drop shadow 2 2 50 8 to the tube.
Now I wrote this as a Old School Tutorial without scraps, however, you can add whatever you want to to this tag. If you are adding scrap items do it now with any drop shadows you wish on them.
Merge Visible and Name this layer Main
Make a new Raster layer
We are going to add a gradient flood fill to this layer.
I used the colors #ED1F20 foreground and #2A1EB3 background. Choose Foreground-background for the color choice under the gradient and then choose Linear with settings Angle 45 Repeats 2 and flood fill your new raster layer.
Go to Layers, New Mask Layer, From Image and choose Mask_0030_DFly from the dropdown menu and make sure the sorce luminance is choosen click ok.
Right click on your mask layer in your layer palette and choose Merge Group
Rename this layer background
You should now have 2 layers Main on top and Background under that
ok now hit Shift + S and this is the same as choosing Image resize and you are going to resize by 85% and make sure the All Layers box is checked.
Now highlight your Main layer and hit Shift + S again and resize 90% but this time make sure resize all layers is unchecked.
Now you can merge all layers and I always do this to make the tag clearer after I do a resize.
Go to Adjust, Sharpen, Unsharpen Mask and use the following settings
Radius 1 Strength 130 Clippings 0 and Luminance checked.
Back to Adjust , Brightness/Contrast , Clarify settings Strength & Effect 2 that is the setting I prefer but play around and see what one you like.
Add your copy write to the tag and merge all layers again.
now you can add Name and you are finished.
Hope you enjoyed this tutorial and if you have any questions or comments please email me at shell.wright@gmail.com
Tags Made by Friends
Made by Dino


Subscribe to:
Posts
(Atom)
Tutorial TOU
 You are free to do as you wish the results of any tutorials as long as it is for non-profit purposes. Please do not hotlink to anything on this site, or direct link to downloads. Just use a link and send them to my blog. If you are making email stationery using my tutorials, please add a note and link in the footer of your stat, thanks. If you have any questions, feel free to: email shell.wright@gmail.com I reserve the right to change my TOU's as I please. So it wouldn't hurt to check back :)