Favorite Stores


Thursday, March 1, 2018
Scripting Tutorial
Scripting Tutorial
This will be a long Tutorial! It needs to be done in parts, so I don't mind if you need to print it out. Just do not claim as your own Please as I have put in ALOT of work on this tutorial.
This will be a long Tutorial! It needs to be done in parts, so I don't mind if you need to print it out. Just do not claim as your own Please as I have put in ALOT of work on this tutorial.
SUPPLIES
SETUP
First I am going to have you set up your folders. you need to do this before even unziping the script.
Go into Windows C Drive and make a Scripting folder there
SETUP
First I am going to have you set up your folders. you need to do this before even unziping the script.
Go into Windows C Drive and make a Scripting folder there

Then your going to go inside your Scripting Folder and make 2 more folders, you will end up with more folders then these two but you only need these two to start. 1st folder Blank Tags and 2nd folder Trusted Scripts

.
Ok now your going to unzip the File TJP-MakeTags and inside that zip you will have 2 files the TFP-MakeTags JascPSP Script is one and you will put this inside the new trusted scripts folder you made.
Ok now your going to unzip the File TJP-MakeTags and inside that zip you will have 2 files the TFP-MakeTags JascPSP Script is one and you will put this inside the new trusted scripts folder you made.

the second file is the TJP-MakeTagsTextforScript1 and is a text file. you will place this in the scripting folder but not inside your trusted scripts folder.

So at this point you should have
1 Main Folder in C:/Drive Called Scripting
2 Folders inside of Scripting Folder Called Blank Tags and Trusted Scripts
1 notepad text file called TJP-MakesTagsTextForScript1 inside Scripting Folder
1 TFP-MakeTags Jasc PSP Script file inside your Trusted Scripts folder.
Ok now we are going to make sure that your psp is pointed to the right folders to allow you to script.
Open your psp
Go to File down to Preferences and over to File Locations


Then under File types highlight Scripts-Trusted #1 On Screenshot
Then Look at your Trusted Script File Folder and make sure your C:\Scripting\TrustedScripts is there. I have circled mine.
#2 on the Screenshot If its not there then you will click the Add Button #3 on the Screenshot a popup box will appear and then just scroll to where the c:\scripting\trusted scripts are and highlight it and click OK. Now that it is there by either being there or you putting it there move down to Folder Options and make sure Enabled and Use sub folders are checked #4 on the screenshot.
Now #5 look at your Save to: and make sure its pointed to your C:\Scripting\TrustedScripts if it is not then click on the little arrow and choose that place.
#6 Once all that is done then hit ok and it should close that window out.
===================================================================
Ok now on to creating the tag you want to script. The one I am going to show you first is Non Animated tags.
Create your tag and decide what font you want for the name and any extra's you want added etc drop shadow or any formatting you want done to the name. I always do this so the recording will go faster and easier. After you are done putting your name on and formatting the extras, take that layer off so your tag doesn't have any name on it, you will see why later.
Ok once you have your tag created we are going to save your tag to the Blank Tag Folder in your Scripting folder. You will want to name it something easy. For instance I put the artist name first then the year and number of the tag. So for example the Elias tag I have in the screenshot is my 1st Elias tag of the year so I named it EliasChatzoudis201801 (Artistname+year+tagnumber) but name them however you want and just remember your going to want to make it easy to find.
Ok so go to file, save as and go to your Blank Tags in C:\Scripting and click on save. and save as a psp file. You have now saved your tag to your Blank tag folder. Leave your tag open in psp.

I want you to reconize the two buttons we will be using to record your actions on your tag. they are the donut looking button called Start Script Record and of course the disk looking button that is Save Script Recording
Ok Hit the Start Recording Button Choose your text tool and add your name as a vector and Apply. Do not worry about placement at this time. then Hit the Save Script Recording button and when your Save As box opens. type the name of your tag in there and make sure its saving to your Trusted Script file that you made in your C:\Drive . example mine is EliasChatzoudis201801

Hit the Start Recording Button again we are going to format your name. Move name at this time if you want it placed somewhere else on the tag and change the name layer to raster layer.Now add your drop shadows or anything else you want on the name at this point. I added eyecandy 4000 gradient glow then my drop shadow. ok now once you have added what you want for formating on the name hit the Save Script Recording and your Save As box will open again. It should already have the name you first saved in the box and your just going to add an a after the name already there so they will stay together in your Trusted Scripts folder.

Now close out your tag and when it asks if you want to save the changed to your tag you say no. you want it to revert back to where it has no name on it.
Ok now on to the Scripting.
You need to get familar with the buttons on the screenshot below, these are the buttons we are going to use to edit your script and then run it.
Ok now on to the Scripting.
You need to get familar with the buttons on the screenshot below, these are the buttons we are going to use to edit your script and then run it.

Go to your Scripting Folder in C:\Scripting and open your notepad TJP-MakeTagsTextForScript1

it will look like this screenshot inside

Click on the little triangle on the Select Script window and choose the name of the script you just made with the name of your tag on it.

.
Now we are going to click on the parchment with a feather looking button which is Edit Selected Script and then you will choose Text Editor

and when it is open it looks like below
Now we are going to click on the parchment with a feather looking button which is Edit Selected Script and then you will choose Text Editor

and when it is open it looks like below

leave open
Now open your TJP-MakeTagsTExtForScript1 Notepad and copy the whole two lines in that file.
Now open your TJP-MakeTagsTExtForScript1 Notepad and copy the whole two lines in that file.

Now go to the Artist notepad that you opened with the edit Selected Script button and Place your curser behind the }) above the #Text line

Push Enter once then paste the 2 lines that you copied from the TJP-MakeTagsTextForScript1 and your results should look like below

Then Scroll down Until you see 'Characters': and you will see the name that you put on your tag. in my case its u'Shell' but your going to highlight that and put in TagName spelled just like that. no ' ' but leave the , see screenshots below and now you can save this tag notepad and then close it out.


Now you will go to the triangle on the select scripts window and choose your TJP-MakeTags script then hit the Parchment with feather icon Edit Selected Scripts and you will change parts of this script. ONLY change where I show you to change.
Scroll down your script until you see Set global Variables

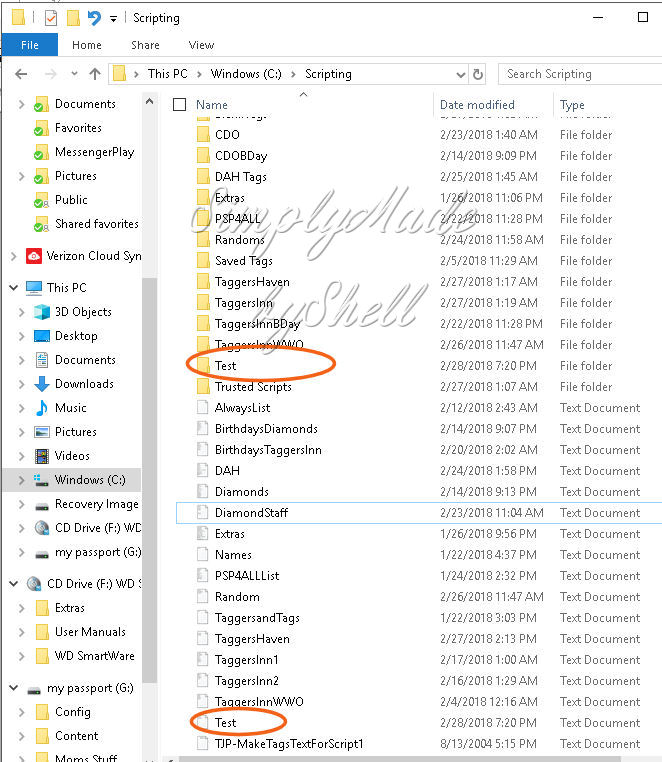
Create a New notepad document Call it Test and add 3 names to test your script

Save it to your C:\Scripting Folder and make a new folder inside your c:\Scripting folder called Test (ignore the rest of my files but see how I have both the folder and textfile in my main scripting folder
Now go back to your TJP-MakeTags-Notepad that you have open and are down to the Set global Variables and we are going to change our script but only where I say.
We will do them in order going down the scrip and we are only going to change 7 places.
The first place to change will be at the strListofNamesFile=r'C:\
Scripting\Test.txt you will put C:\Scripting\Test.txt inbetween the ' ' this is telling the script that you are going to use that text file in that location. It will not always say test.txt as you seen I have different text files in my scripting folder for different groups of people I want to make tags for, for instant one of mine is TaggersHaven so my text file could read TaggersHaven.txt it will always be a notepad.txt file that you have created and placed in your Scripting folder. It will also always follow the C:\Scriptng\ because that is the location. Screenshot after 4th Place
The 2nd place to change your script is the strTemplateFileName we are going to tell the script where to find our blank tag that we want to write on. So remember you need to write between the ' ' your going to put C:\Scripting\BlankTags\EliasChatzoudis201801.pspimage or whatever you named your blank tag, we are telling the script where to find the blank tag and what it is called. another important thing is the file type of the image. mine is always saved as pspimage when I am not doing animated tags. If you don't know what yours is saved at there is a quick way to look, go to your scripting folder and right click on your tag and choose properties and Type of File will show you what your extention should be.

3rd Place to change your script there are two places which you can use to name your tag once it completes, I always use the Suffix one because I always put the person I am naming a tag for first but then add my tag name and then my name, you can decide what you want or how you want to name your tags, I will show you how I do mine and just remember which ever one you use Prefix or Suffix you need to put it between the ' ' so as you see I use the strFileSuffix and between the ' ' I put -EliasChatzoudis201801-Shell because that is how I want my tag named. (NameofPersonMakingtagfor-TagName-MyName and if you want the dashes in you have to put them in because it will look exactly like you have it there.
4th Place to change is the strTagScriptFile1 you need to put your 1st script name where you placed your name on the tag. do not include the c:\Scripting because you do not need the path for this script file. you WILL still have to put it between the ' ' so mine is EliasChatzoudis201801 because that is what I named my 1st script where I put the name on the blank tag.

5th Place to change is the strTagScriptFile2 this is the script you made where you formatted the name. So no path needed you will just put between the ' ' yourscriptname+a so mine is EliasChatzoudis201801a because that is the script I made where I formatted the name, ie dropshadow or whatever you wanted to do to the name.
6th Place to change is the intFileSaveType as you can see there are 4 choices but your normally going to use 1 for saving as a jpg or 4 which is for saving as a png. In this instant I am using 4 because I want to save as a png file.
No ' ' needed on this one
7th Change is the strSaveDir you will also put this between the ' ' and this is where we are telling the script to save our finished tags to. for instance we made a folder named Test in the Main Scripting folder and that is where we are going to save our test tags to. You will have different folders where you want to save tags to in your Scripting Folder so this will change when you have different folders. For right now you will have C:\Scripting\Test because that is where we are putting the finished tags.

Now you go to file save and close this notepad file that you have been working on.
Now we are going to run the script. Go back up to the Script toolbar and make sure your TJP-MakeTags is there and push the button next to it called Run Selected Script

You should be running your 1st tag script now without errors
if your script ran without error then go look in your test Folder in the main Scripting folder and your tags should be in there.
If you have errors go back and open your edit TJP-MakeTags script again and go over where you have to change the script and make sure it is right. if you still can't figure it out you can email me @ shell.wright@gmail.com and let me know what your error is and I will see if I can help you :)
I know this is a longgggg Tutorial but I hope it helped you and your finally scripting your tags now.
Subscribe to:
Post Comments
(Atom)
Tutorial TOU
 You are free to do as you wish the results of any tutorials as long as it is for non-profit purposes. Please do not hotlink to anything on this site, or direct link to downloads. Just use a link and send them to my blog. If you are making email stationery using my tutorials, please add a note and link in the footer of your stat, thanks. If you have any questions, feel free to: email shell.wright@gmail.com I reserve the right to change my TOU's as I please. So it wouldn't hurt to check back :)
fantastic!!!
ReplyDelete